Post by Alex on Aug 4, 2012 12:36:36 GMT 5.5
Mailbox Auto-Mapping in Exchange Server 2010
The feature known as mailbox auto-mapping in Exchange 2010 and how this feature has changed between SP1 and SP2.
The mailbox auto-mapping feature that was first introduced in Exchange Server 2010 Service Pack 1 and which has recently been enhanced in Exchange Server 2010 Service Pack 2. Essentially, this feature allows additional mailboxes that a user has full access permissions against to be automatically opened in the Outlook client. In this article, the starting point is a multi-role Exchange 2010 server with Service Pack 1 deployed. We will look at the feature as it is in Service Pack 1, then proceed to upgrade the Exchange 2010 server to Service Pack 2 in order to see the differences with the feature in Service Pack 2. Along the way, we’ll look at how the feature actually works via troubleshooting procedures.
Mailbox Auto-Mapping in Service Pack 1
how this feature works in Exchange Server 2010 SP1
The starting point is a simple Outlook 2010 profile configured to open my own mailbox. It’s important to understand that at this point only my own mailbox is being accessed and this is the only mailbox shown in Outlook 2010 when it is opened.
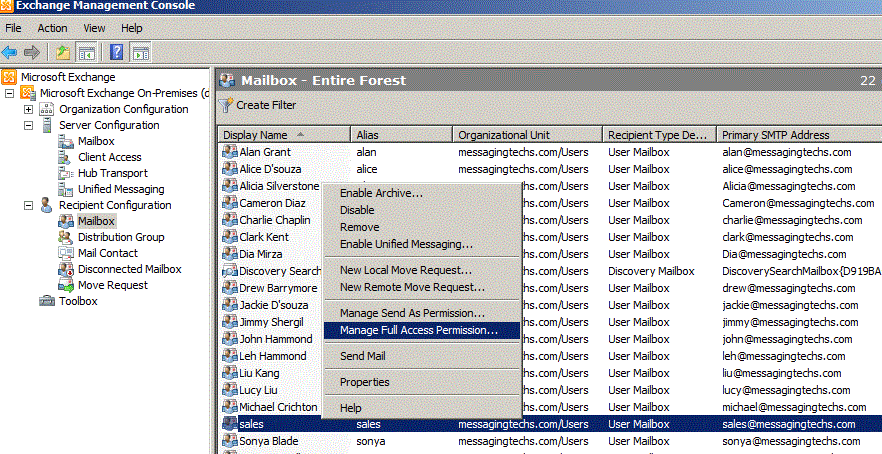
In this example now say that I need to access a shared mailbox, perhaps a mailbox used for incoming sales enquiries. Additionally, I need to respond to sales enquiries by sending messages such that they are seen by the recipient as coming from the sales account and not my own personal account. To do this, I might grant Full Access Permission against the sales shared mailbox using the Manage Full Access Permission option in the Exchange Management Console as you can see in below image
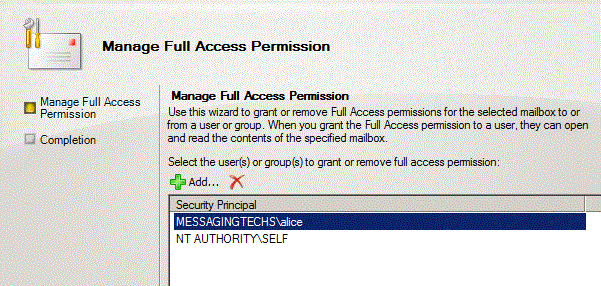
In the Manage Full Access Permission wizard, we grant 'Alice' mailbox Full Access Permission against the Sales mailbox as you can see below image
powershell command
Add-MailboxPermission -Identity 'CN=sales,CN=Users,DC=messagingtechs,DC=com' -User 'MESSAGINGTECHS\alice' -AccessRights 'FullAccess'
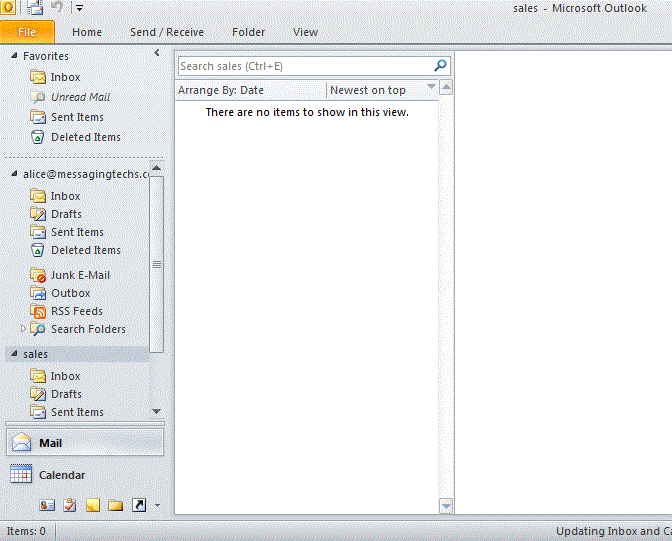
Once this has been performed and the permissions assigned, let’s now see what happens when the user 'Alice' next loads up Outlook 2010. Straight away, you can now see the Sales mailbox within Outlook client of Alice, as you can see from below image. This mailbox was added as part of the auto-mapping feature first introduced in Exchange Server 2010 Service Pack 1.
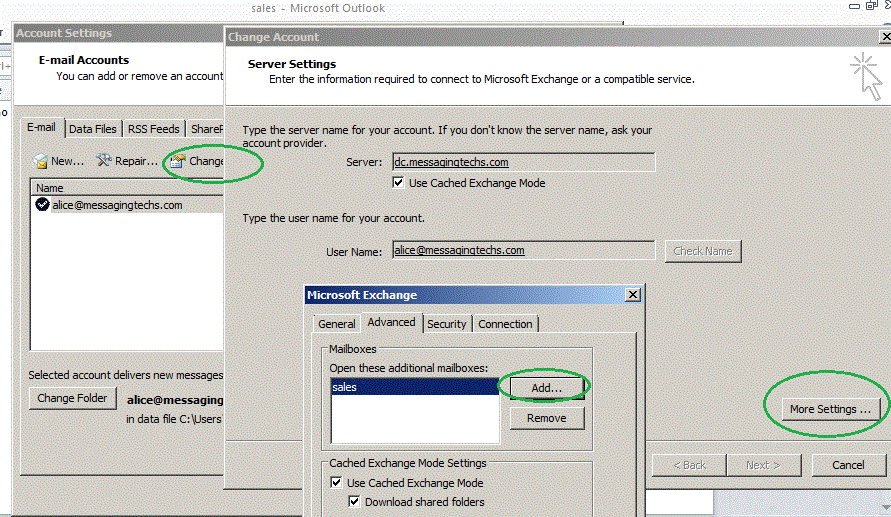
Prior to the auto-mapping feature of Exchange Server 2010 SP1, users could have chosen to manually add the additional mailbox. For example, in Outlook they could have chosen the Account Settings option and gone on to add the additional mailbox via the option that you can see in below image

It can therefore be argued that the auto-mapping feature simplifies the process of adding an additional mailbox by automatically doing the required work. However, this may be confusing to the users if they are not used to this but more importantly there are performance considerations that could arise. For example, if one particular user has full access permissions to many other different mailboxes, all of those additional mailboxes will need to be mapped and opened when Outlook itself is opened.
Groups and Mailbox Auto-Mapping
If you’ve configured Full Access Permission against another mailbox yet that mailbox does not automatically appear in Outlook, you will need to ensure that you understand the auto-mapping process in order to be able to troubleshoot it.
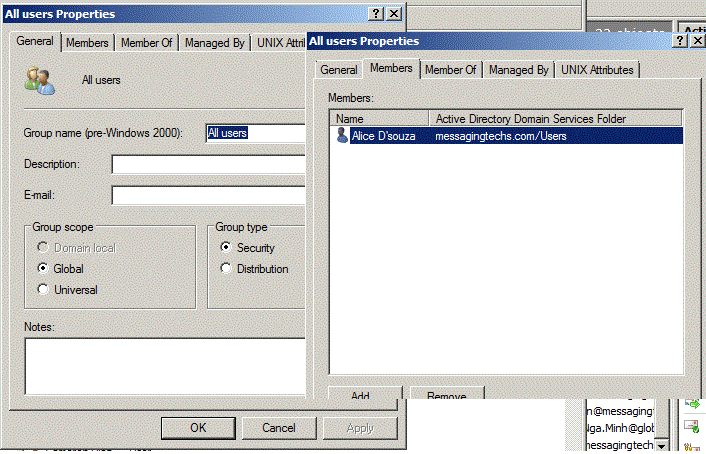
However, before we get into the troubleshooting aspect, it is important to understand that this auto-mapping process does not work if the Full Access Permission is assigned via membership of a group. For example, suppose that we create a new shared mailbox called 'Opportunities' and a new security group called 'All Users'. we then add user 'Alice' account into the All Users group and proceed to configure the All Users group with Full Access Permission against the Opportunities mailbox.

Exchange Management Shell command completed:
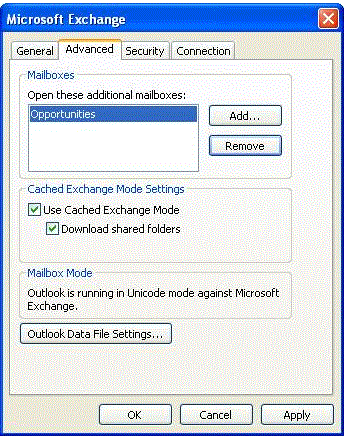
However, when I next load Outlook 2010 and the autodiscover process is invoked, the Opportunities mailbox is not automatically mapped although it is possible to manually add the mailbox through Outlook 2010 as you can see below image. Therefore, it must be remembered that the mailbox auto-mapping feature only works when the full access permission is assigned to an individual mailbox and not a group.
Troubleshooting Mailbox Auto-Mapping : Autodiscover
Details about the shared mailbox that is to be accessed will be returned to the Outlook client by the autodiscover process. This is really handy to know if you are ever in the position where you need to troubleshoot why the auto-mapping feature isn’t working correctly. In this article, I’m using Outlook 2010 but of course the autodiscover process is also available in Outlook 2007. The way to show whether or not the autodiscover process is returning the additional mailbox or mailboxes is to use the Test E-mail AutoConfiguration feature of Outlook 2010. If you’ve ever been involved with troubleshooting the autodiscover service before, I’m sure that you will have already used the Test E-mail AutoConfiguration process. However, I’m going to briefly cover the process here in case it’s a new feature to you but at the same time I also want to show the XML portion of the test process which is something that you may or may not always use in your standard autodiscover troubleshooting procedures.
To use the Test E-mail AutoConfiguration feature, hold down the control key and click the Outlook 2010 icon in the system tray. You will be presented with a menu that includes the option to test the automatic configuration as you can see in image below

Once the Test E-mail AutoConfiguration window has opened, you can proceed to enter the email address and password of the mailbox that you wish to test. As we are only interested in the autodiscover process at this time, the Use Guessmart and Secure Guessmart Authentication check boxes can be cleared. Once you’ve done that, click the Test button and you should be presented with a screen similar to the one shown

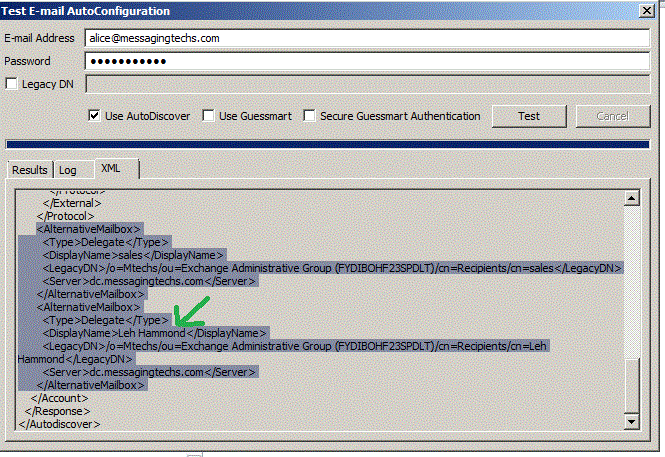
However, it’s not the results of the autodiscover test on the Results tab that we are interested in for this particular scenario. Rather, click the XML tab once the autodiscover test has executed and you should be presented with a screen similar to the one shown inbelow image, I have highlighted the portion of the XML file that starts with <AlternativeMailbox>. You will see in this portion of the XML file that the Sales mailbox information has been returned by the autodiscover process and that the mailbox type has been specified as a delegate mailbox.

example give "alice' full permission over mailbox of 'Leh'
Exchange Management Shell command completed:
When troubleshooting the auto-mapping feature, perhaps because a shared mailbox has not been automatically added to the Outlook profile, you can use the autodiscover process to check whether the XML information contains details about additional mailboxes. If a user has been granted Full Access Permission against multiple mailboxes, you will see additional <AlternativeMailbox> sections in the XML file. For example, in Figure below you can see that an additional mailbox of "Leh" is also returned by the autodiscover process in addition to the Sales shared mailbox that you saw earlier.
We will now look at useful troubleshooting information but this time concentrate on the permissions that are assigned when you grant a mailbox full access permission against another mailbox. We will then look at how you can now disable auto-mapping in Exchange Server 2010 Service Pack 2.
Troubleshooting Mailbox Auto-Mapping : Permissions
When you use either the Exchange Management Console or the Exchange Management Shell to grant a user with full access permission against another mailbox, permissions changes are made to allow this as you might expect. Certain Active Directory attributes are also updated to reflect both the Active Directory account of the mailbox being accessed as well as the Active Directory account of the accessing mailbox. Specifically, you can check the contents of the msExchDelegateListLink and msExchDelegateListBL Active Directory attributes to see these details and it is worth checking these if you have any suspicions that things aren’t working correctly.
Let’s look at using LDP.EXE to see the contents of these attributes. To do this, follow these steps:
1.Run LDP.EXE and then click the Connection menu option. From the Connection menu, click Connect.
2.In the Connect window now presented, configure the details for one of your domain controllers and then click OK. The right-hand pane of the LDP window will now populate with information as LDP connects to the domain controller.
3.From the Connection menu, click Bind and you will be presented with the window shown in image below. Here you can bind with the necessary credentials but in the example shown in image below I’m already logged on as an administrator and I’ve therefore elected to use the Bind as currently logged on user option. ( or else you can put the administrator credentials)


4.You should now be back at the main LDP window. From here, select the View menu and choose the Tree option from this menu.

5.You will now be presented with the Tree View window. Leave the BaseDN field blank and simply click OK.

6.Back at the main LDP window, you should now see that the left-hand pane reveals a connection to the domain information which I have expanded out as you can see below image

7.You can now perform the search for the required attributes. You can either perform the search across the entire domain or, if you know that a specific Organizational Unit (OU) contains all user accounts, you can search that particular OU. In this example, we will search the entire domain. To do this, right-click the domain name at the top of the tree and choose the Search option from the context menu.

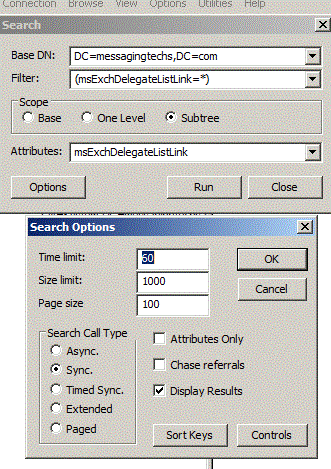
8.In the resulting Search window, the BaseDN field should be set to the domain since that’s where we invoked the search from. To search for objects in the domain that have the msExchDelegateListLink attribute set, enter (msExchDelegateListLink=*) in the Filter field. Next, set the Scope option to Subtree. Finally, since we’re only really interested in the msExchDelegateListLink attribute, we can prevent LDP from returning all attributes by entering msExchDelegateListLink into the Attributes field. Your Search window should look similar to the one shown in image below. Once this window has been populated correctly, click Run to run the search.
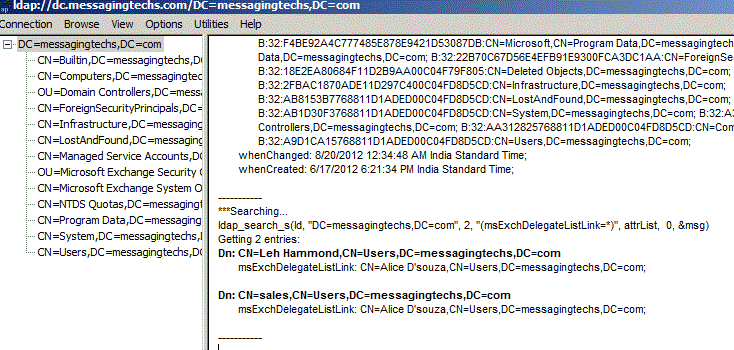
9.The main LDP window should now reveal the results of the search and in my lab the results are shown in below image. Here you can see that two objects match the search criteria, namely the 'Sales' and "Leh Hammond" shared mailboxes, and their distinguished names are presented along with the value set in the msExchDelegateListLink Active Directory attribute. It’s quite clear here which mailbox has been assigned the permissions.
10.Rather than searching for the msExchDelegateListLink attribute, it is also possible to perform the reverse operation by searching for the msExchDelegateListBL attribute. To do this, right-click the domain name in LDP and choose the Search option as you did earlier in step 7.
11.In the Search window, ensure that the Filter field is set to (msExchDelegateListBL=*) and the Attributes field set to msExchDelegateListBL before running this search. This is shown below
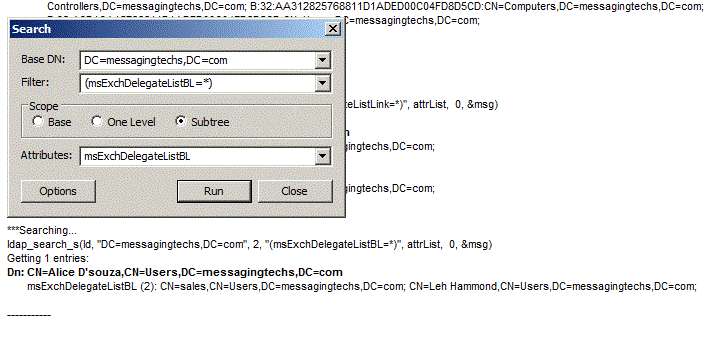
12.The results of this search are shown in above image where it can be seen that "Alice" account object has backlinks for both the 'Leh' and 'Sales' account objects

Auto-Mapping Changes in Service Pack 2
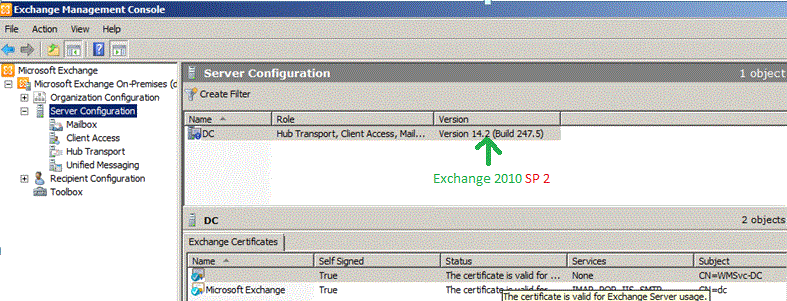
we discussed the fact that auto-mapping occurs automatically in Exchange Server 2010 Service Pack 1 and autodiscover automatically maps all mailboxes such that they are presented in Outlook 2007 or Outlook 2010. Furthermore, this feature cannot be disabled by the users. The good news is Exchange Server 2010 Service Pack 2 allows the administrator to disable this feature. Let’s have a look at how this is done.
The first thing to note is that you cannot use the Exchange Management Console to disable the auto-mapping feature; this feature must be disabled using the Exchange Management Shell. A new parameter called –AutoMapping has been added to the Add-MailboxPermission cmdlet which is a Boolean parameter; this means it can be set to $true or $false.
Back at start of this article, we used the following command to grant the mailbox belonging to Neil full access permission to the Sales shared mailbox:
In Exchange Server 2010 Service Pack 2, we can run the same command but additionally set the –AutoMapping parameter to $false to ensure that mailbox auto-mapping is disabled for this particular mailbox
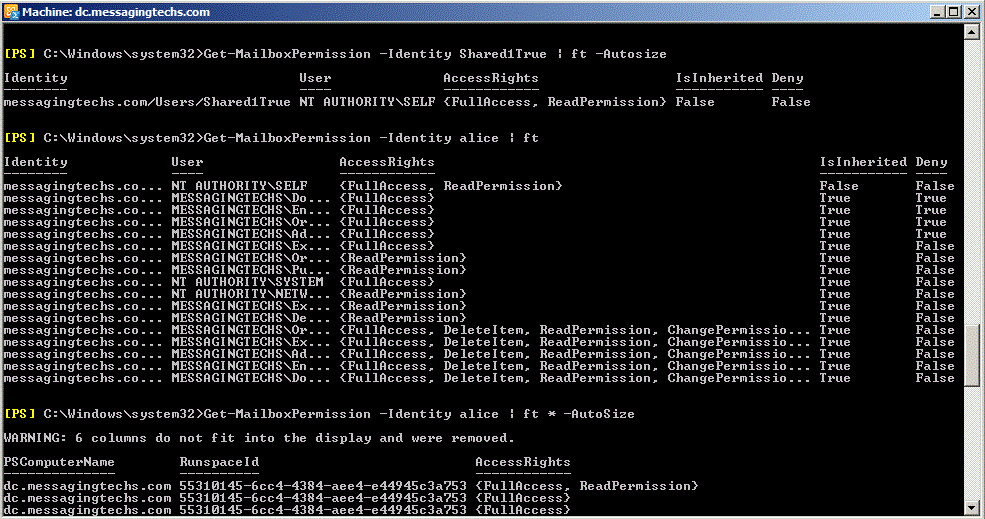
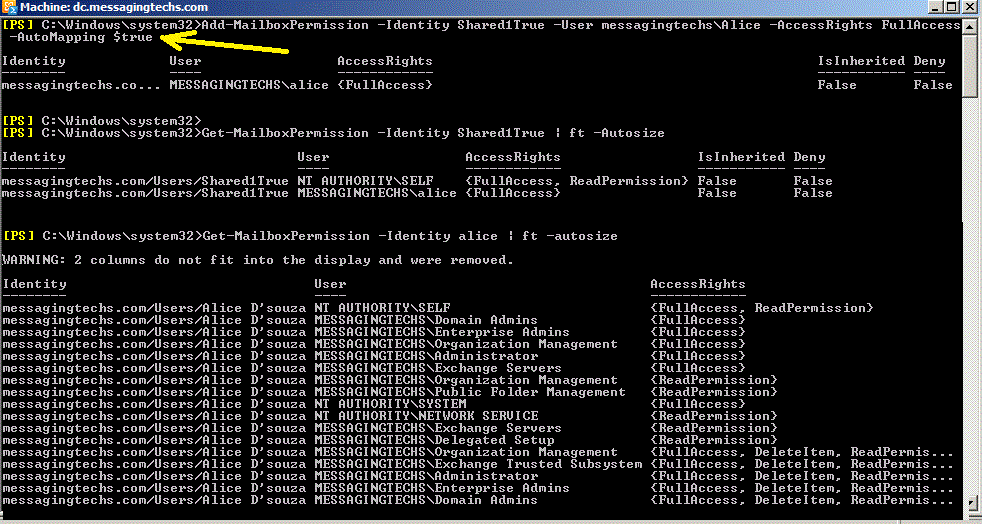
To confirm this, we have created two shared mailboxes named Shared1True and Shared2False. For the mailbox called Shared1True, we will set the –AutoMapping parameter to $true and for the mailbox called Shared2False we will set the same parameter to $false. The results of running these commands are shown below ( when we give full access to 'alice' over this mailboxes.
Add-MailboxPermission –Identity Shared1True –User messagingtechs\Alice –AccessRights FullAccess –AutoMapping $true
Add-MailboxPermission –Identity Shared2False –User messagingtechs\Alice –AccessRights FullAccess –AutoMapping $false

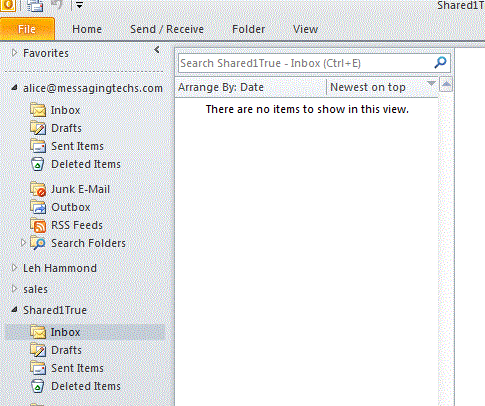
The test is then to launch Outlook and let autodiscover do its work, the results of which are shown in image below Sure enough, the only mailbox that is automatically mapped is the Shared1True mailbox which clearly means that the Shared2False mailbox has not been automatically mapped as we desired.
The mailbox auto-mapping feature that you will find in both Exchange Server 2010 Service Pack 1 and Service Pack 2. The ability for the administrator to disable this feature via the Add-MailboxPermission cmdlet is a welcome addition in Service Pack 2 and one that administrators will surely use.
The feature known as mailbox auto-mapping in Exchange 2010 and how this feature has changed between SP1 and SP2.
The mailbox auto-mapping feature that was first introduced in Exchange Server 2010 Service Pack 1 and which has recently been enhanced in Exchange Server 2010 Service Pack 2. Essentially, this feature allows additional mailboxes that a user has full access permissions against to be automatically opened in the Outlook client. In this article, the starting point is a multi-role Exchange 2010 server with Service Pack 1 deployed. We will look at the feature as it is in Service Pack 1, then proceed to upgrade the Exchange 2010 server to Service Pack 2 in order to see the differences with the feature in Service Pack 2. Along the way, we’ll look at how the feature actually works via troubleshooting procedures.
Mailbox Auto-Mapping in Service Pack 1
how this feature works in Exchange Server 2010 SP1
The starting point is a simple Outlook 2010 profile configured to open my own mailbox. It’s important to understand that at this point only my own mailbox is being accessed and this is the only mailbox shown in Outlook 2010 when it is opened.
In this example now say that I need to access a shared mailbox, perhaps a mailbox used for incoming sales enquiries. Additionally, I need to respond to sales enquiries by sending messages such that they are seen by the recipient as coming from the sales account and not my own personal account. To do this, I might grant Full Access Permission against the sales shared mailbox using the Manage Full Access Permission option in the Exchange Management Console as you can see in below image

In the Manage Full Access Permission wizard, we grant 'Alice' mailbox Full Access Permission against the Sales mailbox as you can see below image

powershell command
Add-MailboxPermission -Identity 'CN=sales,CN=Users,DC=messagingtechs,DC=com' -User 'MESSAGINGTECHS\alice' -AccessRights 'FullAccess'
Once this has been performed and the permissions assigned, let’s now see what happens when the user 'Alice' next loads up Outlook 2010. Straight away, you can now see the Sales mailbox within Outlook client of Alice, as you can see from below image. This mailbox was added as part of the auto-mapping feature first introduced in Exchange Server 2010 Service Pack 1.

Prior to the auto-mapping feature of Exchange Server 2010 SP1, users could have chosen to manually add the additional mailbox. For example, in Outlook they could have chosen the Account Settings option and gone on to add the additional mailbox via the option that you can see in below image


It can therefore be argued that the auto-mapping feature simplifies the process of adding an additional mailbox by automatically doing the required work. However, this may be confusing to the users if they are not used to this but more importantly there are performance considerations that could arise. For example, if one particular user has full access permissions to many other different mailboxes, all of those additional mailboxes will need to be mapped and opened when Outlook itself is opened.
Groups and Mailbox Auto-Mapping
If you’ve configured Full Access Permission against another mailbox yet that mailbox does not automatically appear in Outlook, you will need to ensure that you understand the auto-mapping process in order to be able to troubleshoot it.
However, before we get into the troubleshooting aspect, it is important to understand that this auto-mapping process does not work if the Full Access Permission is assigned via membership of a group. For example, suppose that we create a new shared mailbox called 'Opportunities' and a new security group called 'All Users'. we then add user 'Alice' account into the All Users group and proceed to configure the All Users group with Full Access Permission against the Opportunities mailbox.


Exchange Management Shell command completed:
Add-MailboxPermission -Identity 'CN=Opportunities,CN=Users,DC=messagingtechs,DC=com' -User 'MESSAGINGTECHS\All users' -AccessRights 'FullAccess'
However, when I next load Outlook 2010 and the autodiscover process is invoked, the Opportunities mailbox is not automatically mapped although it is possible to manually add the mailbox through Outlook 2010 as you can see below image. Therefore, it must be remembered that the mailbox auto-mapping feature only works when the full access permission is assigned to an individual mailbox and not a group.

Troubleshooting Mailbox Auto-Mapping : Autodiscover
Details about the shared mailbox that is to be accessed will be returned to the Outlook client by the autodiscover process. This is really handy to know if you are ever in the position where you need to troubleshoot why the auto-mapping feature isn’t working correctly. In this article, I’m using Outlook 2010 but of course the autodiscover process is also available in Outlook 2007. The way to show whether or not the autodiscover process is returning the additional mailbox or mailboxes is to use the Test E-mail AutoConfiguration feature of Outlook 2010. If you’ve ever been involved with troubleshooting the autodiscover service before, I’m sure that you will have already used the Test E-mail AutoConfiguration process. However, I’m going to briefly cover the process here in case it’s a new feature to you but at the same time I also want to show the XML portion of the test process which is something that you may or may not always use in your standard autodiscover troubleshooting procedures.
To use the Test E-mail AutoConfiguration feature, hold down the control key and click the Outlook 2010 icon in the system tray. You will be presented with a menu that includes the option to test the automatic configuration as you can see in image below

Once the Test E-mail AutoConfiguration window has opened, you can proceed to enter the email address and password of the mailbox that you wish to test. As we are only interested in the autodiscover process at this time, the Use Guessmart and Secure Guessmart Authentication check boxes can be cleared. Once you’ve done that, click the Test button and you should be presented with a screen similar to the one shown

However, it’s not the results of the autodiscover test on the Results tab that we are interested in for this particular scenario. Rather, click the XML tab once the autodiscover test has executed and you should be presented with a screen similar to the one shown inbelow image, I have highlighted the portion of the XML file that starts with <AlternativeMailbox>. You will see in this portion of the XML file that the Sales mailbox information has been returned by the autodiscover process and that the mailbox type has been specified as a delegate mailbox.

example give "alice' full permission over mailbox of 'Leh'
Exchange Management Shell command completed:
Add-MailboxPermission -Identity 'CN=Leh Hammond,CN=Users,DC=messagingtechs,DC=com' -User 'MESSAGINGTECHS\alice' -AccessRights 'FullAccess'
When troubleshooting the auto-mapping feature, perhaps because a shared mailbox has not been automatically added to the Outlook profile, you can use the autodiscover process to check whether the XML information contains details about additional mailboxes. If a user has been granted Full Access Permission against multiple mailboxes, you will see additional <AlternativeMailbox> sections in the XML file. For example, in Figure below you can see that an additional mailbox of "Leh" is also returned by the autodiscover process in addition to the Sales shared mailbox that you saw earlier.

We will now look at useful troubleshooting information but this time concentrate on the permissions that are assigned when you grant a mailbox full access permission against another mailbox. We will then look at how you can now disable auto-mapping in Exchange Server 2010 Service Pack 2.
Troubleshooting Mailbox Auto-Mapping : Permissions
When you use either the Exchange Management Console or the Exchange Management Shell to grant a user with full access permission against another mailbox, permissions changes are made to allow this as you might expect. Certain Active Directory attributes are also updated to reflect both the Active Directory account of the mailbox being accessed as well as the Active Directory account of the accessing mailbox. Specifically, you can check the contents of the msExchDelegateListLink and msExchDelegateListBL Active Directory attributes to see these details and it is worth checking these if you have any suspicions that things aren’t working correctly.
Let’s look at using LDP.EXE to see the contents of these attributes. To do this, follow these steps:
1.Run LDP.EXE and then click the Connection menu option. From the Connection menu, click Connect.
2.In the Connect window now presented, configure the details for one of your domain controllers and then click OK. The right-hand pane of the LDP window will now populate with information as LDP connects to the domain controller.
3.From the Connection menu, click Bind and you will be presented with the window shown in image below. Here you can bind with the necessary credentials but in the example shown in image below I’m already logged on as an administrator and I’ve therefore elected to use the Bind as currently logged on user option. ( or else you can put the administrator credentials)


4.You should now be back at the main LDP window. From here, select the View menu and choose the Tree option from this menu.

5.You will now be presented with the Tree View window. Leave the BaseDN field blank and simply click OK.

6.Back at the main LDP window, you should now see that the left-hand pane reveals a connection to the domain information which I have expanded out as you can see below image

7.You can now perform the search for the required attributes. You can either perform the search across the entire domain or, if you know that a specific Organizational Unit (OU) contains all user accounts, you can search that particular OU. In this example, we will search the entire domain. To do this, right-click the domain name at the top of the tree and choose the Search option from the context menu.

8.In the resulting Search window, the BaseDN field should be set to the domain since that’s where we invoked the search from. To search for objects in the domain that have the msExchDelegateListLink attribute set, enter (msExchDelegateListLink=*) in the Filter field. Next, set the Scope option to Subtree. Finally, since we’re only really interested in the msExchDelegateListLink attribute, we can prevent LDP from returning all attributes by entering msExchDelegateListLink into the Attributes field. Your Search window should look similar to the one shown in image below. Once this window has been populated correctly, click Run to run the search.

9.The main LDP window should now reveal the results of the search and in my lab the results are shown in below image. Here you can see that two objects match the search criteria, namely the 'Sales' and "Leh Hammond" shared mailboxes, and their distinguished names are presented along with the value set in the msExchDelegateListLink Active Directory attribute. It’s quite clear here which mailbox has been assigned the permissions.

10.Rather than searching for the msExchDelegateListLink attribute, it is also possible to perform the reverse operation by searching for the msExchDelegateListBL attribute. To do this, right-click the domain name in LDP and choose the Search option as you did earlier in step 7.
11.In the Search window, ensure that the Filter field is set to (msExchDelegateListBL=*) and the Attributes field set to msExchDelegateListBL before running this search. This is shown below

12.The results of this search are shown in above image where it can be seen that "Alice" account object has backlinks for both the 'Leh' and 'Sales' account objects


Auto-Mapping Changes in Service Pack 2
we discussed the fact that auto-mapping occurs automatically in Exchange Server 2010 Service Pack 1 and autodiscover automatically maps all mailboxes such that they are presented in Outlook 2007 or Outlook 2010. Furthermore, this feature cannot be disabled by the users. The good news is Exchange Server 2010 Service Pack 2 allows the administrator to disable this feature. Let’s have a look at how this is done.
The first thing to note is that you cannot use the Exchange Management Console to disable the auto-mapping feature; this feature must be disabled using the Exchange Management Shell. A new parameter called –AutoMapping has been added to the Add-MailboxPermission cmdlet which is a Boolean parameter; this means it can be set to $true or $false.

Back at start of this article, we used the following command to grant the mailbox belonging to Neil full access permission to the Sales shared mailbox:
Add-MailboxPermission –Identity Sales –User messagingtechs\Alice –AccessRights FullAccess
In Exchange Server 2010 Service Pack 2, we can run the same command but additionally set the –AutoMapping parameter to $false to ensure that mailbox auto-mapping is disabled for this particular mailbox
Add-MailboxPermission –Identity Sales –User messagingtechs\Alice –AccessRights FullAccess –AutoMapping $false
To confirm this, we have created two shared mailboxes named Shared1True and Shared2False. For the mailbox called Shared1True, we will set the –AutoMapping parameter to $true and for the mailbox called Shared2False we will set the same parameter to $false. The results of running these commands are shown below ( when we give full access to 'alice' over this mailboxes.
Add-MailboxPermission –Identity Shared1True –User messagingtechs\Alice –AccessRights FullAccess –AutoMapping $true
Add-MailboxPermission –Identity Shared2False –User messagingtechs\Alice –AccessRights FullAccess –AutoMapping $false


The test is then to launch Outlook and let autodiscover do its work, the results of which are shown in image below Sure enough, the only mailbox that is automatically mapped is the Shared1True mailbox which clearly means that the Shared2False mailbox has not been automatically mapped as we desired.

The mailbox auto-mapping feature that you will find in both Exchange Server 2010 Service Pack 1 and Service Pack 2. The ability for the administrator to disable this feature via the Add-MailboxPermission cmdlet is a welcome addition in Service Pack 2 and one that administrators will surely use.
